Bruce Varner Photography BruceVarner.com


Shooting the Often Overlooked Kodak Instamatic 500
Page 3
--Advancing the Re-Loaded Film in An Instamatic 500 Camera--
Back To Page 2: 126 Cassette Reloading Methods
As mentioned on the first page, reloading a 126 cartridge in any manner other than exact recreation of factory 126 film, results in constraints and changes in how a reloaded cassette functions inside the Instamatic 500 camera. Each method has its good and bad points. Here I will explain how to advance film in the reloaded 126 cassette for each method. Then, what real life results have looked like for me when used in various Kodak Instamatic 500 cameras.
Factory Film Method: After placing the cassette into
the camera....
< Wind the film advance lever eight times (These are full
130 degree winds)
< You may or may not need to advance the film a final
small amount to set the shutter
< You are now ready for the first shot
< After each shot, wind the lever fully (These will be about 120 degree
winds)
< After the last shot, wind the lever fully several times until film is
all
on the take up spool (These are full 130 dergee winds)
Note the differing wind amounts. When using 35mm film in the 126 cartridge, the wind is only about 90 degrees before the internal film advance lever catches in a film sprocket hole. That is why the need to wind twice when using film with no backing.
Method #1: Reproducing 126 film: As mentioned on page 1, this method reproduces as exactly as possible the holes/slots in new film so as to function just as the original did. There is no reason to explain further film advancing for this method. It is exactly as designed for factory film. Results with this method is exact, minimal image spacing.
Method #2: Reloading with 35mm film. No paper backing. When the 126 cassette is reloaded with 35mm film only, as described on page 2, specific film advance is required. Because 35mm film has continious, close spaced holes along its edge, the film can only advance in the camera, the amount equal to about 90 degrees travel of the advance lever. This is slightly over 1/2 of the distance needed to move the film from one image, to the next. Factory film avoids this problem by only having holes/slots in the film and backing paper, at the exact distance needed to have the film advance the needed distance to the next frame. The internal Instamatic 500 camera lever that catches the film withdraws from the film and the advance begins. This lever then pops back out to catch the factory film when it advances to the next slot. Because the replacement 35mm film has hole so close togather, it stops the film too quickly. For this reason the procedure must be different from designed. As practiced by most individuals, two advances of the film are required after each shot to advance the film far enough for the next shot. But since the shutter must be released after each advance, this exposes the film again, half way through the advance! To avoid one must fully cover the lens to ensure that no light enters the camera during this "in between" trip of the shutter. Because there is no backing paper, this short stroke occurs even during initial install and final completion of the roll. I have a method to avoid this (At least on the 500) that I explain in Method #3. Here is found the accepted instructions for method #2.....
< Install the reloaded 126 cassette w/35mm film only (No backng paper)
< Wind the advance lever 90
degrees
(As far as it will go)
< Cover the lens completely so no light gets in
through the lens
< Trip the shutter with the lens fully covered
< Do
this 6 times to advance the film far enough to be ready for the first
exposure
< Compose, set exposure, expose the 1st image
< Wind the
advance lever 90 degrees
(As far as it will go)
< Cover the lens completely
so no light gets in through the lens
< Trip the shutter with the lens
fully covered
< Wind the advance lever 90 degrees
(As far as it will go).
You are now ready for the next exposure
< Compose, set exposure, expose
the 2nd image
< Continue this process for each successive exposure
<
Once you have guessed that you have reached the point where no further
exposures can be made, cover the lens as described above
< Cover lens,
wind, and trip the shutter several times to ensure that the film is fully
around the take up spool
You can expect to find developed images on your exposed film that are evenly spaced, but almost 1/2 image width between images. This does reduce the number of images that can be exposed on a given length of film.
Also, in my experience I find that it is very difficult to keep light leaks from damaging the film. Not just because of the in-between trips of the shutter, but because of the need to be in very low, or no light to remove the exposed cartridge. Remember that once the 35mm film has been exposed and is fully around the take-up spool, it is easy for light to leak into the cartridge through the area where the film had been in place for exposures. Plus the fit of the spools into the cartridge is loose and can allow light in. Using accessories such as a shade or filter on the lens that is not light tight, can allow some light to leak onto the film.
I know that others seem to not have this problem. If you do not, great! See the sample light leaks & spacing on the image below. (Before anyone says that it must be the camera, know that I have tested this using several Instamatic cameras. It is always the same. Shooting with no backing paper results in at least some light leakage. Shooting the same cameras with backing paper results in no light leaks.)
Method #3: Reloading with 35mm film. Using paper backing. This is the method I use. It is not an exact method. Exposed negatives will not always have exact spacing. The space between images will also sometimes be more than that between the film only method.
This 3rd method uses the same 35mm film as method #2, however the new film is taped
onto the factory paper backing replacing the original. Using paper
backing gives extra light leak protection for the film and does not require
taping the window on the cassette or the camera back.
This method does allow for initial film advancement to be similar to
the factory film method.
However, a modified film advance method is employed. It involves
holding the shutter release button down while advancing the film. This
can be successful with the Kodak Instamatic 500.
For this technique to work, the cassette must be loaded just as described
on page 2. The order of film
advance must be followed exactly.
Read through the process and become familiar with it.
Use a practice film and backing paper to practice loading and
shooting several
times before exposing images for real.
To advance the cassette once placed into the
camera:
1) Hold the shutter release button down. While holding the shutter release
button down,
2) Wind the advance lever (Full 130 degree advances of the lever) seven
times.
3) At some point during the winds (Likely during the fine wind)
you will see the red mark you made on the backing paper scroll by. So
long as the line has past the window by an inch or so, you will know that
you have film ready for the first image.
4)
Release your finger from the shutter button.
5) Try and advance the film
again. If it does not advance, you are ready for your first exposure.
If it does advance, it will likely be a short stroke that will set the
shutter.
6) The indicator in the window will likely not have reached the 1st number yet, but
that is ok.
7)
Compose, set exposure, take the 1st image. Make sure you let off the
shutter button after the exposure.
8) When ready to advance film for the next shot, first
press the shutter release button and hold!
9) Wind the advance lever 1
full turn (About 130 Degrees) while holding the shutter button down.
If the advance did not wind the full 130 degrees, continue to hold down the
shutter button and advance a second full wind.
10)
Release the shutter button first, & then allow the advance lever to return.
It is probable that the internal film advance lever will be between
sprocket holes, or caught too early. WITHOUT holding down on the
shutter button, wind the advance lever an additional short stroke. The
film will catch and you are now ready for the next exposure.
11) Compose,
set exposure, expose the 2nd image
12) Continue this process of holding
down on the shutter button, wind, release of shutter button, return of
winding lever, & winding again a small amount, for each successive exposure
13) Once you have reached the point where you are past the second red mark
on the backing paper, hold down the
shutter release button and wind several times until the film is
fully around the take up spool.
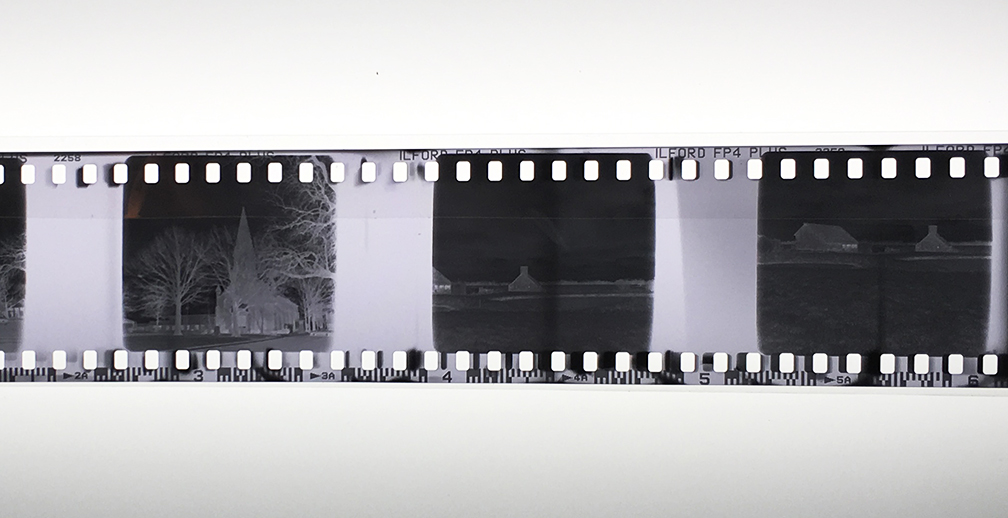
This method does NOT result in evenly spaced images on the film. You will find the spacing likely different between each image in the roll (See Below). This is because the length of the oblong hole in the backing paper and in the original film is equal to about 3 sprocket holes in 35mm film. As you wind, the internal advance lever can catch in any one of these 3 holes. If first hole is just short of a complete wind and results in the need to advance the film again. If the wind results in the internal lever landing in the third hole, on possibly in between holes, the second advance can result in the shutter not being set and the need to again fully advance again to set the shutter. This is what happened between the 4th and 5th image below.
Of course this also results in the numbers seen on the paper backing advancing two digits instead of one. For that reason I do not go by the exposure numbers on the paper to remember how many exposures have been made. You must keep track of that yourself.
With a 12 exposure paper backing and the film length cut the same length as the factory, you should get about 9 or 10 shots per roll. Just look at the paper backing as you advance for each shot and you will see when the second red mark passes the window. That will let you know that you can expose no more images.
There are those who will argue that it is a waste to only have 9 shots per roll. That is fine. Try other size rolls. I just would rather have 9 shots that I am comfortable will function as expected and have no light leaks, than have more exposures available per cassette. A 36 shot roll of 35mm film is about the right length to load two cassettes for (19" film ea) with only a few inches left over.
One final note on shooting with paper backing. While the paper backing does last for several reloads, it does not last forever. If I was using an Instamatic 500 as my primary shooter, I would create a template and cut new backings accasionally.

If one wants to shoot method #2 (Only film and no backing), I find that holding down the shutter release removes the need for two full advances between shots. And therefore removes the need to release the shutter between shots. It does however cause a slightly larger distance between exposures and sometimes the need for the short stroke to set the shutter. Happy Shooting!
Back To Page 1: Shooting the Often Overlooked Kodak Instamatic 500
Copyright: Bruce Varner 1972-2021